
A new SURF(Summer Undergraduate Research Fellowships) project of 2018 has been launched now, and it is based the outcomes of SURF 2017 project (Indoor Localization Based on Wi-Fi Fingerprinting with Deep Learning and Fuzzy Sets). As the members of both projects, Klaus would introduce to new members of previous work related to server part, as well as a work summary of last project, and it’s the reason for writing this blog.
Indoor Localization —- Background problems
Key words:
- RSS: Received signal strength 接收信号强度 (usually between 0dbm and -90dbm)
- RSSI: Received signal strength Indication 接收信号强度指示 (adjusted RSS presented as a positive value )
- SSID (ESSID): Service Set Identifier (changeable)
- BSSID: mac address of the service (unique)
- AP: Accessing point 接入点
- TOA: Time of arrival 到达时间
- TDOA: Time difference of arrival 到达时间差
- AOA: Angle of arrival
Why not GPS
- No direct line of sight between satellites and receives.
Why choose RF fingerprinting schemes
- Widespread network devices —- easily deployable.
- Reasonable performance
- Affordable cost
Global Positioning System (GPS) is commonly used for outdoor localization but it performs poorly in indoor environment, because it demands a direct line of sight between the satellites and the receiver for accurate localization. WiFi signals are widely distributed within indoor environment, then the usage of it for localization would need no extra hardware and is very economical. However, traditional methods which based on time and angles may not be suitable for WiFi signals, that why the fingerprints methods are widely applied.
Algorithms used in Indoor Localization
Triangulation algorithm
Where the dark circles are the reference points with known coordination, the white circle is testing point with unknown coordinate. Ideally, due to the characteristic of RF signals which is the degradation of signal strength over distance, it is possible to obtain a final distance to the reference point according to the detected signal strength, and with three circles of possible locations, we finally determined the real location.
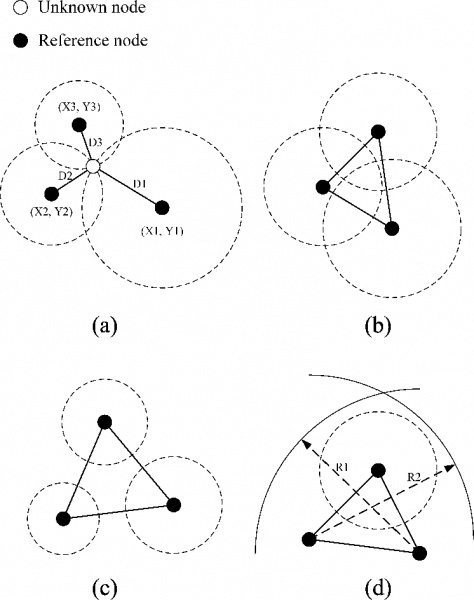
However, in indoor environment, the signal strength varies irregularly, as it gets further away from the radio transmitter, due to phenomenon such as reflection, diffraction, and interference. The irregularity becomes the main cause for the inaccuracy for the inaccuracy of existing RF signal-based indoor localization algorithms.
Fingerprint localization algorithm
Data collection and storage.
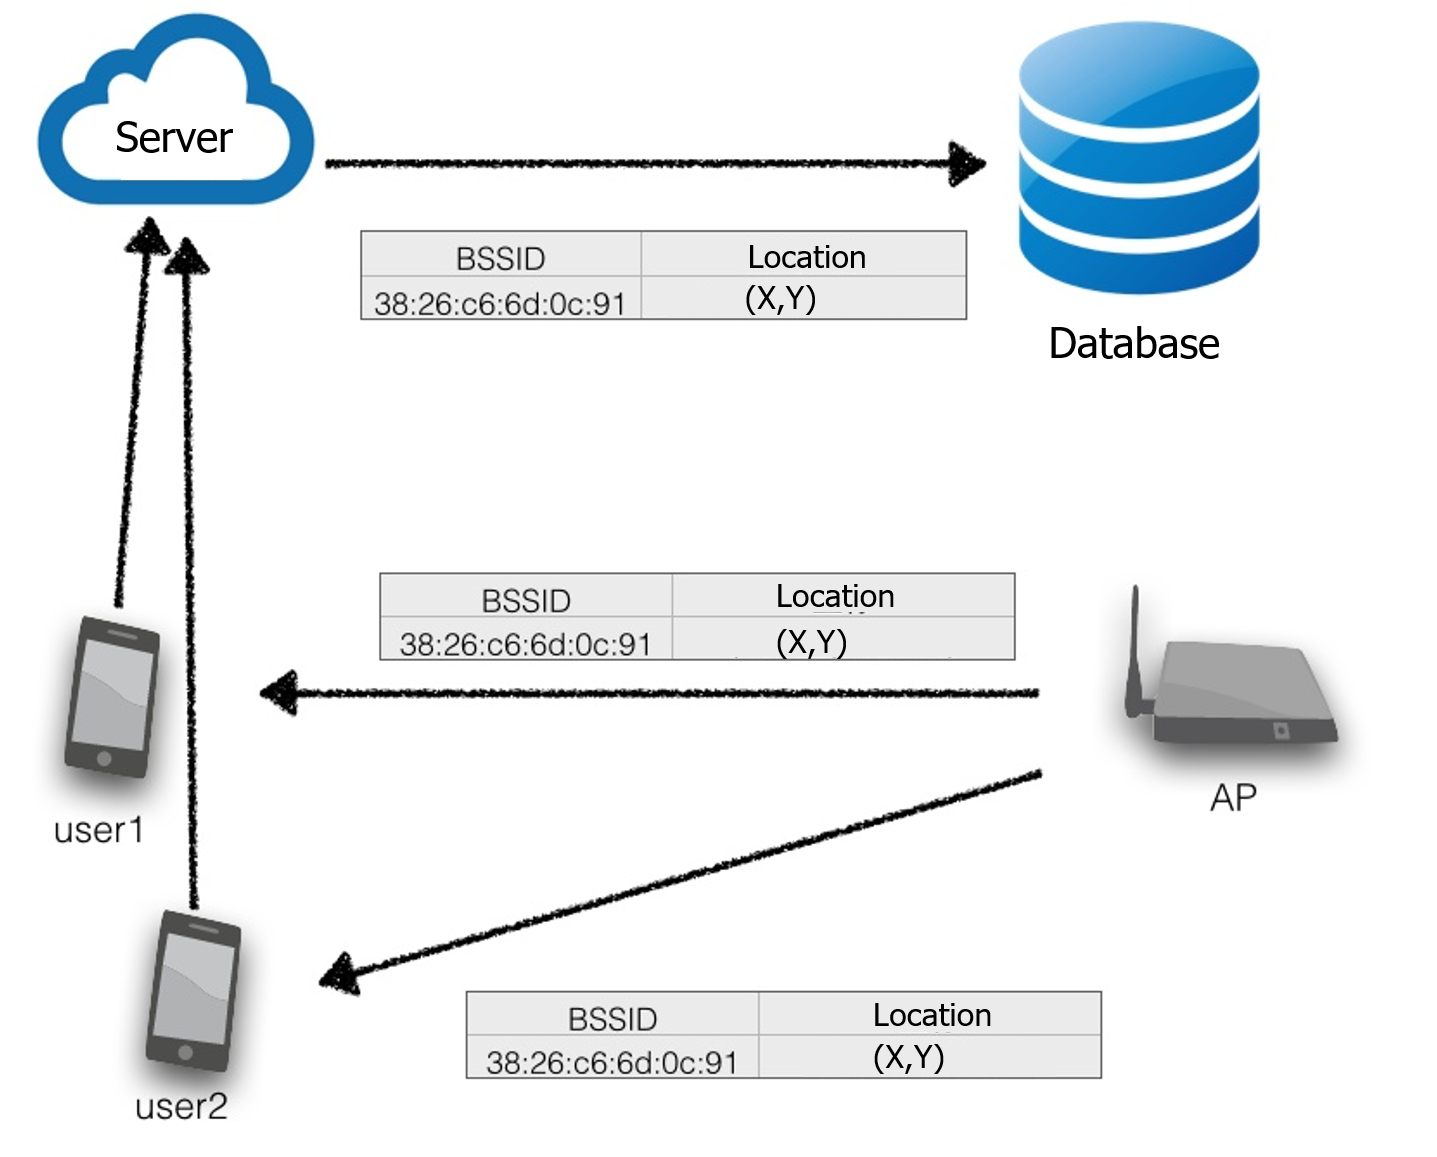
Use mobile devices (mobile phone, Raspberry Pi and so on) to scan the near APs as well as the related BSSID, which combines with location coordinates are stored in the database as fingerprint, and the fingerprint indicates this location. Usually, there need plenty of fingerprints for one location in terms of different direction and height of scanning as well as different time period of one day, to ensure the complete coverage and robustness. However, as discussed before, a huge amount of data need to be collected, which is a large cost of time and labour; and the requirements for server part and data storage is also very high.
Train the neural network and model generation
This part is carried out by Jeff Wong, with the collected data it is able to generate a DNN-based indoor localization model.
Testing.
- client (Android mobile phone with WiFiScanner, or Raspberry Pi)
- server with localization algorithm
- Communication though hyper text transfer protocol (HTTP)
When a client, i.e., an Android App running on a user’s mobile phone, submits scanned RSSs, the server estimates its location based on the implemented localization algorithm and returns the estimated location back to the client.
As you may see, the algorithm is not that difficult, the most of time is spent in the engineering part, including the Flask server construction, android programming as well as database managing, then I will go in details of there parts.
WampServer

WampServer is a Windows web development environment which combines Apache, PHP, and MySQL. Before the construction of FLASK, it was used to quickly build up a local web server, test the connection and communication between it and the mobile phone, as well as a prototype of data collection and storage.
- Quick start up and prototyping
- Complete environment
Anaconda (set up the environment)
Anaconda is very convenient to build up the virtual environment and manage packages, but it is not necessary. You could just use python to build the virtual environment, too. Just choose the way you like.
Anaconda is very powerful and is’s highly recommended while dealing with Python and R data science and machine learning on Windows, Linux, and Mac OS X. I personally regard it as a libraries management platform which enables multi-versions control. It is recommended to build virtual environment for every project with different version requirement for libraries and applications, while avoid conflicts with others.
- Python + R, data science + machine learning
- multi-platform —- Windows, Linux, and Mac OS X
- Libraries management

Download and Installation
Download_address (Python 3.6 version)
Conda testing
Just like git command, the conda is both packages manager and environment manager. After the installation, to test if conda works well.
1
2
3
Windows + R
cmd
conda --version ::it return the version of condaIf the command “conda” is not found, add it to the path of system environment variables. With any confusion of the commands, try
--help1
2:: is followed with comments
conda <command> --help ::command + --help to find more informationUsually the downloaded Anaconda installer may not be the newest version, we new to update it,
1
2
3conda update conda
::check the update detials and confirm
y
Build up the first environment and activate it
As the tensorflow supports up to Python version 3.5 (at least during the SURF 2017 period), this version is recommended. Type below to build up the environment with python 3.5.
1
conda create --name <enviroment_name> python=3.5
Tips1: There are many commands starting with
--, it is very convenient, useconda --helporconda -hto refer to it.Tip2: If not typing preferred python version like
python==3.5, default version will be installed, for the Anaconda 3.6 the python 3.6 will be installed.Then activate the environment,
1
activate <enviroment_name>
Then the environment name is added in the front of command surrounded with round brackets, like
(test) C:\A_programs\Anaconda\envs>.Check all environments by
1
2
3
conda info -e
::or
conda info --envsDeactivate the environment by
1
deactivate
If you want to switch to another environment
1
activate <another_enviroment_name>
Sometimes we need to clone a complete environment as a backup, try
1
conda create -n <enviroment_name> --clone <clone_enviroment_name>
When you want to remove an environment, try
1
2
conda remove -n <enviroment_name> --all
conda info -e ::check itor remove one package,
1
conda remove -n <enviroment_name> <package_name>
Packages management
1
2
conda list ::display all installed packages
conda search <package_name> ::check if packeages are availableFor some packages that cannot be installed by
conda, we could usepipwhich has been prepared in Anaconda.
Flask

Why Flask? what it is ?
There are several popular web frameworks, which are Django, web.py, tornado, and flask. They have different features,
- Django is popular but heavy and complex.
- web.py is light but not maintained now.
- tornado has not much libraries as flask, may need some repetitive work.
- flask is light, popular, flexible, and extensible.
Flask is a microframework for Python based on Werkzeug (The python WSGI Utility Library ), Jinja2( a full featured template engine for Python ) and good intentions. With flask, a whole web application could be fit into a single python file, with essential functionality; the choices of database and templating engine are also up to users, that is why flask is flexible and can be everything!
For our project, as both flask and deep learning(DL) framework are based on python, we can seamlessly integrate them all within a python inside the flask framework. Between receiving a POST request from a user (with a new RSS measurement as part of the request) and receiving a GET request from the same user for a estimated location, we need to call a location estimation function all inside the flask framework.
RESTful framework
Representational State Transfer (REST) is an architectural style that defines a set of constraints and properties based on HTTP.
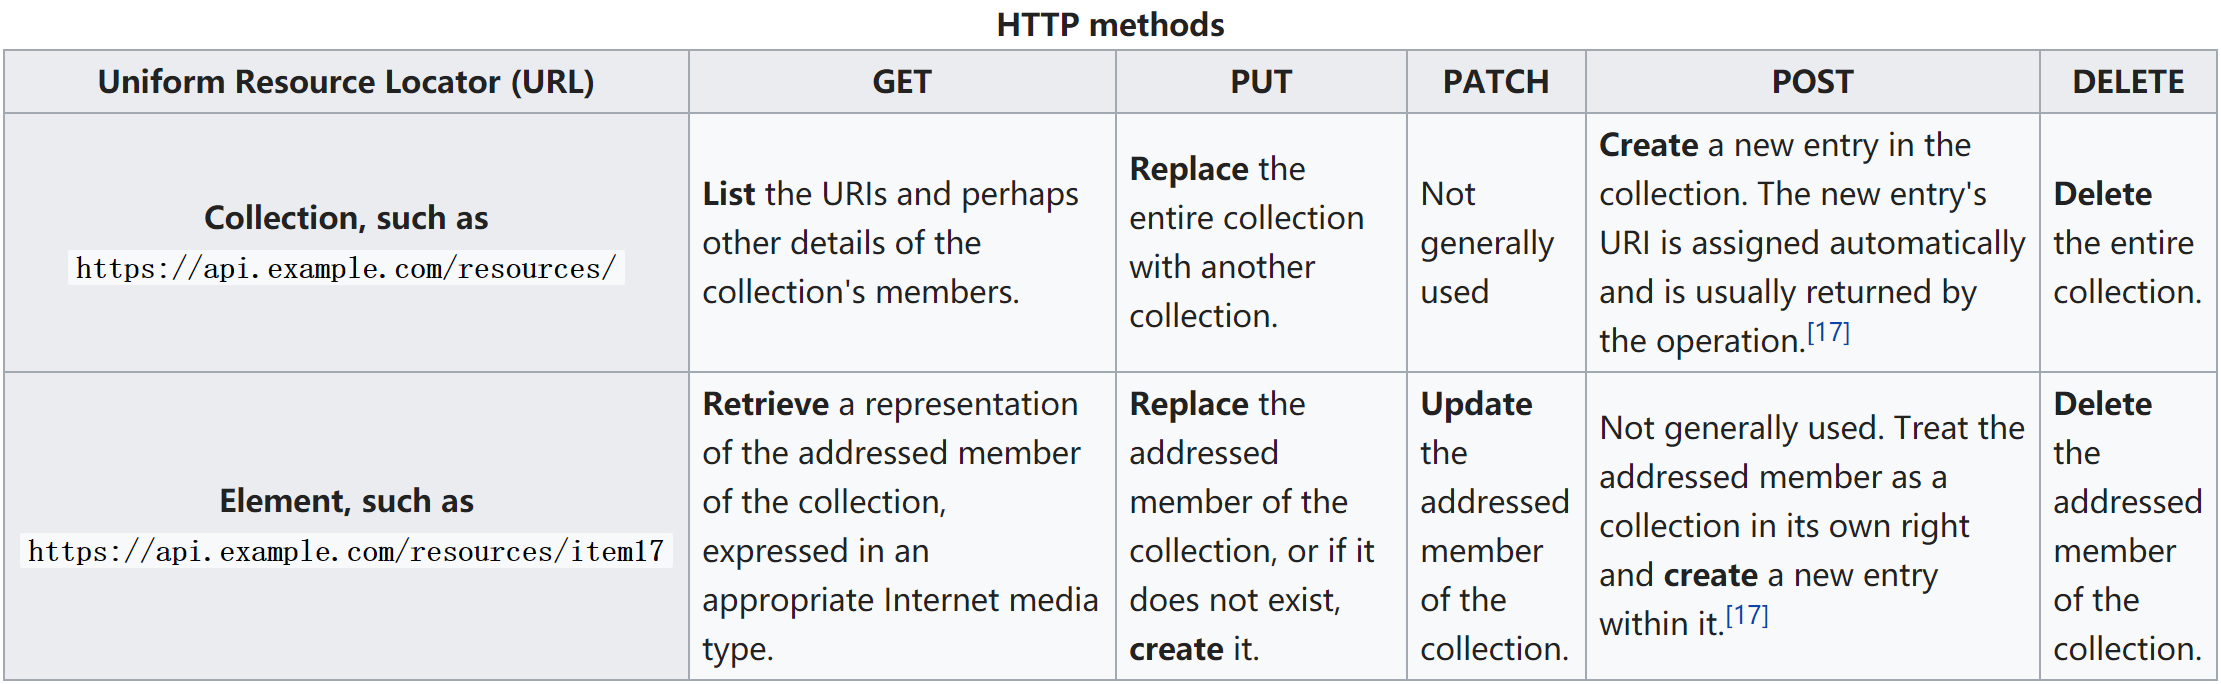
GET — Provides a read only access to a resource.
PUT — Used to create a new resource.
DELETE — Used to remove a resource.
POST — Used to update an existing resource or create a new resource.
p.s. If your want to learn more about RESTful framework, try this RESTful Web Services.
Installation for Windows
Firstly, activate the preferred environment, then use pip to install related packages,
1 | cd <enviroment_name>\Scripts ::all below packages should be installed under folder Scriptes |
Installation for Linux, OS X or Cygwin
1 | ::#You'd better try pip3 instead of pip, in case both python2 an python3 exist |
Copy and paste relevant files
To have a quick start of building up the environment of last SURF, access to 2018 SURF Repository and clone or open it through desktop, find the folder named flask, copy all files and paste into your own flask environment, e.g. if the address of your environment is C:\programs\Anaconda\envs\flask_new>, then just paste within the flask_new folder.
About these pasted files, they have different function and are discriminated according to names.
main_user.pyis the main file which functions when testing the real locations.main_build_DBis the main file during the data collection and storage period, which helps to build up the database.db_xxx.pythese files have db_ at front, which fulfill the functions of creating, upgrading, downgrading, and migrating the database, separately.fingerprints.dbis the database file which has to be opened though sqlite3.mapping.pyAs the detected APs have to be stored in the database with a specified order (according to filemapping.csv), meanwhile, some APs may not be detected in one time of scanning, the mapping step is very important.xxx.csvcontains all the detected data, which has the same information as database.function_version.pymodel.pyare DNN relevant files.
Install TensorFlow and keras to run main_user file
A quick test of the file main_user.py need the environment of TensorFlow (CPU version, while GPU version is optional) and Keras, which could be installed by typing below commands.
1 | pip install tensorflow |
Tips: Actually, there is a convenient way to install some of the packages, conda install anaconda would install most of the packages which are related to python data science, including flask-related packages, pandas, sklearn, matplotlib, jinja2, scipy, numpy, etc, but big neural network modules like tensorflow and keras are not included.
After the installation of these python third party packages, some small modification of files are necessary before funning the main file.
1 | cd C:\<need to change>\Anaconda\envs\flask\lib\site-packages\flask_sqlalchemy\__init__.py:789 |
Address setting
- Localhost address :
127.0.0.1 - IPv4 address
Then go to main_user.py and jump to the last row of host address, for localhost, change it to 127.0.0.1, e.g. after modification it becomes app.run(host='127.0.0.1', debug=True); or if we want to debugging through internet, type ipconfig in cmd and find the IPv4 address, replace default address with it. Till now, every preparation work has been finished, under the correct path and try
1 | (flask_new) C:\Anaconda\envs\flask_new>python main_user.py |
If every thing goes well, the response code would be
1 | * Serving Flask app "main_user" (lazy loading) |
Functions explanation —- main_build_DB.py
There were some pities that although we had constructed the database, it was just used as a backup, that is to say, in both collection and testing periods, the data changes happened firstly between server and .csv files and then between .csv files and database. The characteristics of multitasking of database, which is efficient, was not fully utilized.
There are several functions, which are
- initializeTemList() : initialize the tempList.csv with data in mapping.csv.
- isEmpty() : Check xxx.csv and tempList.csv are empty, if so, complete them.
- tempList(BSSID, Level, Room, Model, Time) : Write one single RSS data into tempList.csv.
- addCSV(Building, Room…) : add one time’s scanning results to main .csv file.
- refreshCSV(Room,Model,Time) : Put one time scanning result into xxx.csv and oneTime.csv, then set tempList.csv file to default value.
P.S. For more details, please refer to github repository.
Improvements
RESTful —- GET method
Due to the time limitation and shorts of hands, the GET method within android and server part was not implemented, as a result, the presentation prototype is based on a laptop to display the estimation location. Hope that for the SURF-2018 the GET
flask-restful library
The basic functions could be realized through flask library, but the code is still not tight. Then the flask-restful library could be imported to make the code tight and simple.
To install it, try
1
pip install flask-restful
Robustness
In case the situation of posting incomplete data (like lacking the information of locations which is typed by user through mobile phone) and make more restrictions to the types of data, some functions could be added to strength the robustness of server.
- To be added.